BBQ Cheeseburger Sliders Recipe
Get ready to indulge in an explosion of flavors with these BBQ Cheeseburger Sliders! With a perfect blend of smoky BBQ sauce, melted cheese, and juicy beef patties, these sliders are a delightful treat for your taste buds. Their juicy texture and smoky aroma make them the perfect snack for gatherings, parties, or a cozy evening in. Whether you’re hosting a summer BBQ or just craving something delicious, this recipe will surely become a family favorite.
Prep Time: 20 minutes
Cook Time: 15 minutes
Total Time: 35 minutes
Servings: 12 sliders
Ingredients
For the Sliders:
- 2 lbs ground beef (80/20 blend for best flavor)
- 2 tablespoons Worcestershire sauce
- 1 teaspoon garlic powder
- 1 teaspoon onion powder
- 1 teaspoon smoked paprika
- 1 teaspoon salt
- ½ teaspoon black pepper
- 12 slider buns
- 12 slices of cheddar cheese
- 1 cup BBQ sauce (your favorite brand)
For Garnish (Optional):
- Pickles
- Lettuce
- Sliced tomatoes
- Red onion slices
Step-by-Step Instructions
Prepare the Beef Mixture: In a large mixing bowl, combine the ground beef with Worcestershire sauce, garlic powder, onion powder, smoked paprika, salt, and black pepper. Use your hands to mix the ingredients gently, being careful not to overwork the meat which can make it tough.
Shape the Patties: Divide the beef mixture into 12 equal portions and shape each into a small patty, about 1-inch thick. Make a small indentation in the center of each patty using your thumb; this helps them cook evenly and prevents puffing up.
Preheat the Grill or Skillet: If you’re grilling, preheat your grill to medium-high heat. If using a skillet, heat over medium heat.
Cook the Patties: Place the patties on the grill or skillet. Cook for about 4-5 minutes on one side until browned. Flip the patties and cook for another 3-4 minutes on the other side.
Add BBQ Sauce and Cheese: During the last minute of cooking, brush a generous amount of BBQ sauce on each patty, then place a slice of cheddar cheese on top. Cover the grill or skillet to help the cheese melt.
Toast the Buns: While the cheese melts, toast the slider buns on the grill or in a toaster until golden brown.
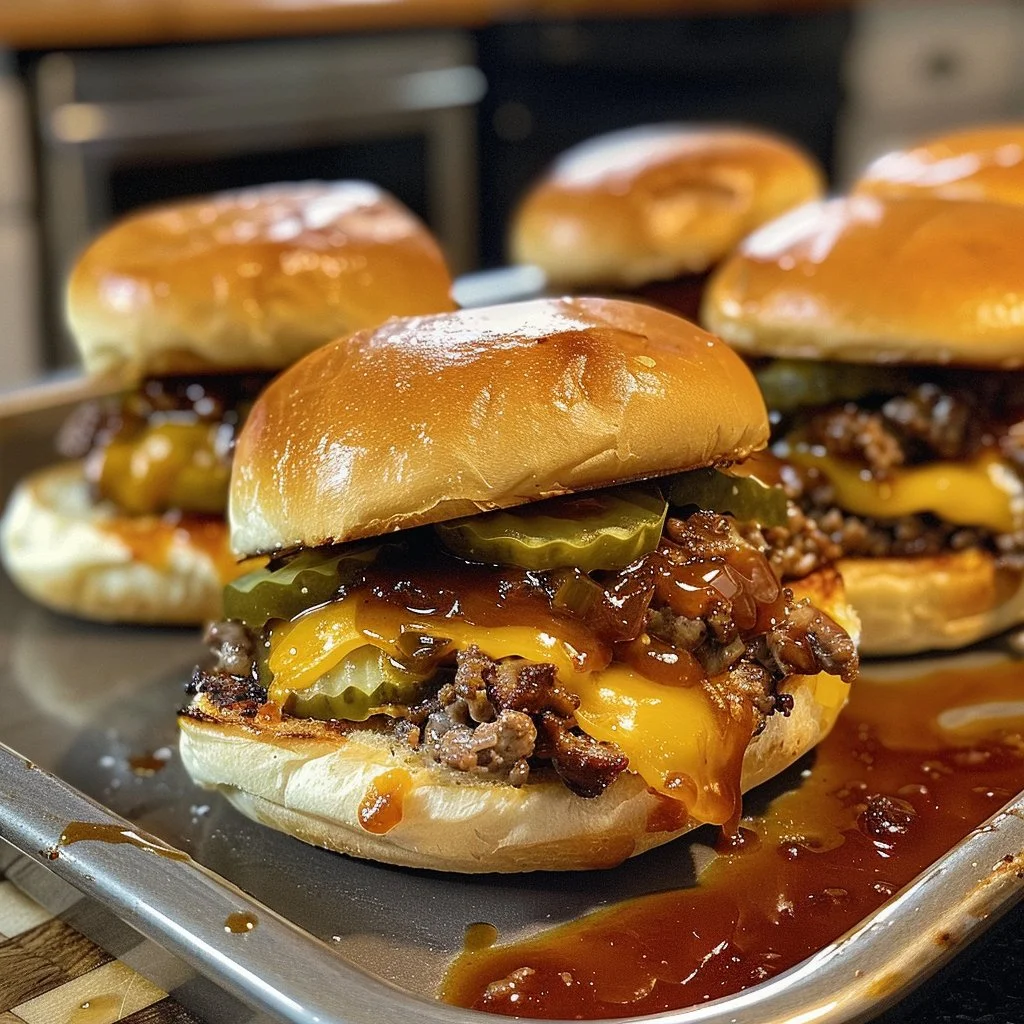
Assemble the Sliders: Once the cheese is melted, remove the patties from the grill. Place each patty on the bottom half of a toasted slider bun. Add extra BBQ sauce if desired and top with pickles, lettuce, sliced tomatoes, and red onions. Cover with the top half of the bun.
Serve: Serve the BBQ cheeseburger sliders warm, and enjoy the delicious flavors that will make your mouth water!
Pro Tips for Perfect Results
Choose Quality Meat: Using ground beef with some fat content (like 80/20) will give you juicier sliders. Lean meat can lead to dry patties.
Customize the BBQ Sauce: Experiment with different styles of BBQ sauce, whether sweet, spicy, or tangy, to elevate the flavor profile of your sliders.
Let the Patties Rest: Allow the patties to rest for a couple of minutes after cooking to help retain their juices.
Add Extras: Get creative with toppings like avocado, jalapeños, or bacon for an extra burst of flavor.
Serve with a Side: Pair your sliders with coleslaw, fries, or a fresh salad for a complete meal.
Variations and Substitutions
- Turkey or Chicken: For a lighter option, use ground turkey or chicken instead of beef. Just be sure to add moist ingredients like grated zucchini or carrots to keep the patties juicy.
- Vegan Sliders: Try black bean patties or chickpea patties as a delicious plant-based alternative. Just adjust the seasoning to enhance the flavor.
- Cheese Options: Feel free to use other types of cheese such as pepper jack for a spicy kick or gouda for a creamy touch.
- Gluten-Free: Use gluten-free slider buns to make this recipe suitable for those with gluten sensitivities.
Storage and Reheating Tips
To store leftover sliders, wrap them tightly in plastic wrap or aluminum foil and place them in an airtight container. They will keep in the refrigerator for up to 3 days. For longer storage, you can freeze them by placing the assembled sliders in a single layer on a baking sheet until firm, then wrap them individually and store in a freezer-safe bag for up to 3 months.
To reheat, simply microwave the sliders for 30-60 seconds or place them in a preheated oven at 350°F until warmed through. If frozen, let them thaw overnight in the refrigerator before reheating.
FAQ
1. Can I make the patties ahead of time?
Yes! You can prepare the patties ahead of time and refrigerate them for up to 24 hours before cooking. This can also enhance their flavor as the seasonings meld.
2. How do I make them spicy?
To add some heat, mix diced jalapeños or crushed red pepper flakes into the beef mixture, or top with spicy BBQ sauce and pepper jack cheese.
3. Can I use different buns?
Absolutely! Feel free to experiment with different types of buns like brioche, pretzel, or whole grain, depending on your preference.
4. What if I don’t have a grill?
You can easily cook the patties in a skillet or on a stovetop grill pan. Just make sure to cook them over medium heat to prevent burning.
Nutrition Estimate
Each BBQ cheeseburger slider contains approximately 220 calories, 12 grams of protein, 18 grams of carbohydrates, and 10 grams of fat. These nutritional values can vary based on the specific ingredients and portion sizes used.
Indulging in these BBQ cheeseburger sliders will not only satisfy your hunger but also provide a wonderful culinary experience. Serve them at your next gathering, and watch as your guests rave about their delicious flavors!

BBQ Cheeseburger Sliders
Ingredients
For the Sliders
- 2 lbs ground beef (80/20 blend for best flavor) Choose quality meat to ensure juiciness.
- 2 tablespoons Worcestershire sauce
- 1 teaspoon garlic powder
- 1 teaspoon onion powder
- 1 teaspoon smoked paprika
- 1 teaspoon salt
- 1/2 teaspoon black pepper
- 12 pieces slider buns
- 12 slices cheddar cheese Feel free to experiment with other cheese types.
- 1 cup BBQ sauce (your favorite brand) Customize flavor with different BBQ sauce styles.
For Garnish (Optional)
- Pickles
- Lettuce
- Sliced tomatoes
- Red onion slices
Instructions
Preparation
- In a large mixing bowl, combine the ground beef with Worcestershire sauce, garlic powder, onion powder, smoked paprika, salt, and black pepper. Mix gently to avoid overworking the meat.
Cooking
- Divide the beef mixture into 12 equal portions and shape each into a small patty, about 1-inch thick with an indentation in the center.
- Preheat your grill to medium-high heat or heat a skillet over medium heat.
- Cook the patties on the grill or skillet for about 4-5 minutes on one side until browned, then flip and cook for another 3-4 minutes.
- Brush BBQ sauce on each patty and top with a slice of cheddar cheese during the last minute of cooking. Cover to melt the cheese.
- Toast the slider buns on the grill or in a toaster until golden brown.
- Assemble the sliders by placing a patty on the bottom half of each toasted bun. Add extra BBQ sauce, pickles, lettuce, tomatoes, and red onions before covering with the top half of the bun.
Serving
- Serve the BBQ cheeseburger sliders warm and enjoy the delightful flavors.
