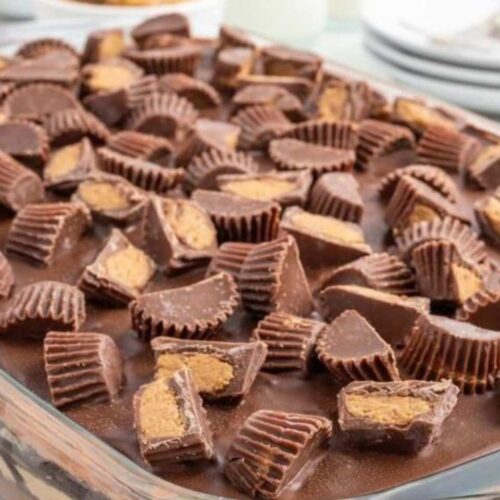
Indulging in the world of desserts, our journey today takes us into the realm of the irresistible Peanut Butter Icebox Cake. A delightful treat that marries the rich flavors of chocolate, peanut butter, and creaminess, this cake is not only a feast for the taste buds but also a joy to prepare. Let’s dive into the details of creating this luscious Peanut Butter Icebox Cake step by step.
Ingredients Unveiled
CHOCOLATE PUDDING LAYER:
- Crushed Chocolate Sandwich Cookies (19.1 ounces): A decadent foundation for our cake.
- Salted Sweet Cream Butter (1/2 cup, melted): Adding a buttery touch to the cookie crumbs.
- Instant Chocolate Pudding Mix (Two 3.9-ounce boxes): The heart of our chocolatey layer.
- Whole Milk (2 cups): Bringing creaminess to the pudding mix.
- Whipped Topping (2 cups, thawed): A light and fluffy addition to elevate the pudding.
- Miniature Reese’s Peanut Butter Cups (5 cups, halved): A heavenly surprise in every bite.
PEANUT BUTTER LAYER:
- Cream Cheese (8-ounce package, softened): The creamy base for our peanut butter layer.
- Creamy Peanut Butter (1 cup): Introducing the star ingredient with your favorite brand.
- Powdered Sugar (1 1/2 cups, sifted): Sweetening the peanut butter goodness.
- Whipped Topping (2 cups, thawed): Ensuring a light and airy texture.
- Chocolate Magic Shell (7.25-ounce bottle): A magic touch for the perfect finish.
Instructions: Crafting the Peanut Butter Masterpiece
- Prepare the Base:
- Lightly spray a 9×13 baking dish with nonstick spray.
- Combine 2 cups of crushed chocolate sandwich cookies with melted butter, press into the bottom of the dish.
- Chocolate Pudding Layer:
- Mix pudding mix and milk until thickened.
- Fold in whipped topping and spread half over the cookie base.
- Add halved peanut butter cups and crushed cookies.
- Peanut Butter Layer:
- Combine cream cheese, peanut butter, and powdered sugar until smooth.
- Fold in whipped topping and spread over the cookie and chocolate layers.
- Finishing Touches:
- Sprinkle more crushed cookies over the peanut butter layer.
- Layer the remaining chocolate pudding mixture.
- Drizzle chocolate magic shell and top with more peanut butter cups.
- Chill and Serve:
- Cover and chill in the refrigerator for at least 4 hours to overnight.
- Slice into 3×5 portions before serving.
Conclusion
The Peanut Butter Icebox Cake is a symphony of flavors and textures that dances on your palate. Its layers, from the crunchy cookie base to the silky chocolate pudding and the creamy peanut butter topping, create a dessert masterpiece worth savoring. Perfect for any occasion, this cake is sure to be a crowd-pleaser and a go-to recipe in your repertoire of delightful desserts.
Frequently Asked Questions (FAQs)
- Can I use different types of chocolate cookies for the base?
- Absolutely! Experiment with your favorite chocolate cookies for a personalized touch.
- Is it necessary to chill the cake for the suggested time?
- Chilling allows the layers to set and flavors to meld, enhancing the overall taste. It’s highly recommended for the best results.
- Can I substitute the chocolate magic shell with homemade chocolate sauce?
- While you can, the magic shell adds a unique texture and flavor, so it’s worth sticking to for the authentic experience.
- How long can the Peanut Butter Icebox Cake be stored in the refrigerator?
- It can be stored for up to three days, but the fresher, the better!
- Can I freeze the cake for a more extended storage period?
- Yes, you can freeze it for up to a month. Thaw in the refrigerator before serving for the best consistency.
Get ready to embark on a culinary adventure with the Peanut Butter Icebox Cake. Unleash your creativity and treat yourself to a dessert that’s as fun to make as it is to eat.

Peanut Butter Icebox Cake
Ingredients
Chocolate Pudding Layer
- 19.1 ounces Crushed Chocolate Sandwich Cookies A decadent foundation for our cake.
- 0.5 cup Salted Sweet Cream Butter, melted Adding a buttery touch.
- 2 boxes Instant Chocolate Pudding Mix (Each 3.9-ounce) The heart of our chocolatey layer.
- 2 cups Whole Milk Bringing creaminess to the pudding mix.
- 2 cups Whipped Topping, thawed A light and fluffy addition.
- 5 cups Miniature Reese's Peanut Butter Cups, halved A heavenly surprise in every bite.
Peanut Butter Layer
- 8 ounces Cream Cheese, softened The creamy base for our peanut butter layer.
- 1 cup Creamy Peanut Butter Introducing the star ingredient.
- 1.5 cups Powdered Sugar, sifted Sweetening the peanut butter goodness.
- 2 cups Whipped Topping, thawed Ensuring a light and airy texture.
- 7.25 ounces Chocolate Magic Shell For the perfect finish.
Instructions
Preparation
- Lightly spray a 9x13 baking dish with nonstick spray.
- Combine 2 cups of crushed chocolate sandwich cookies with melted butter, press into the bottom of the dish.
Chocolate Pudding Layer
- Mix pudding mix and milk until thickened.
- Fold in whipped topping and spread half over the cookie base.
- Add halved peanut butter cups and crushed cookies.
Peanut Butter Layer
- Combine cream cheese, peanut butter, and powdered sugar until smooth.
- Fold in whipped topping and spread over the cookie and chocolate layers.
Finishing Touches
- Sprinkle more crushed cookies over the peanut butter layer.
- Layer the remaining chocolate pudding mixture.
- Drizzle chocolate magic shell and top with more peanut butter cups.
Chill and Serve
- Cover and chill in the refrigerator for at least 240 minutes (4 hours) to overnight.
- Slice into 15 pieces before serving.


