
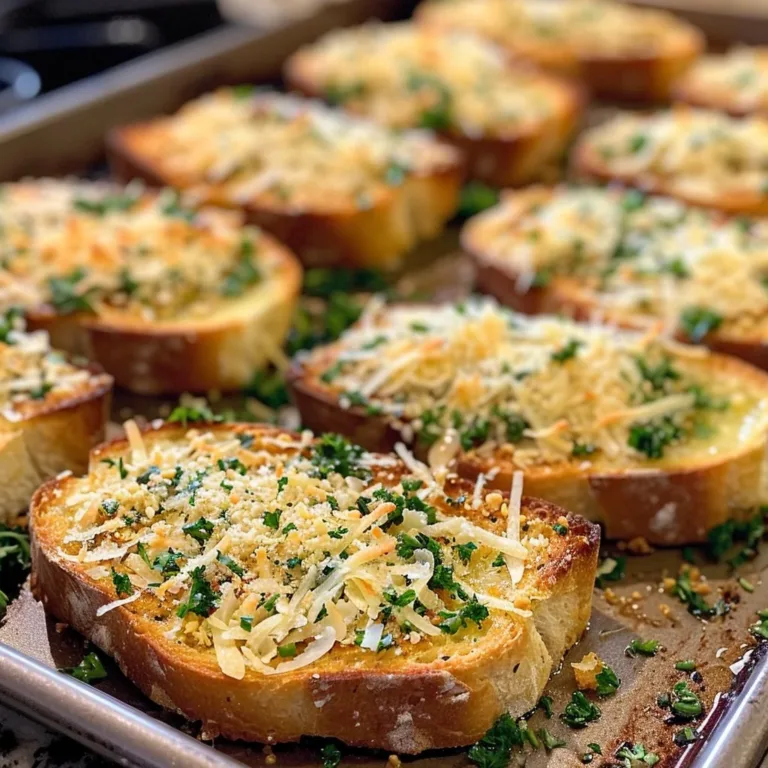
Garlic Bread Toast Slices: A Delectable Delight
If you’re searching for the perfect side dish to elevate your meal, look no further than our delightful Garlic Bread Toast Slices. This recipe is a fragrant and flavorful masterpiece, combining the crispy texture of toasted bread with the rich, aromatic blend of garlic and butter. The first bite reveals a harmonious crunch followed by a burst of savory goodness that fills your senses with warmth. Whether served alongside pasta, salad, or soup, this garlic bread will surely steal the show.
Prep Time, Cook Time, and Servings
To prepare these delicious Garlic Bread Toast Slices, you’ll need about 10 minutes of prep time and 10 minutes of cooking time, bringing the total to 20 minutes. This recipe serves 4 people, making it perfect for a family dinner or a small gathering with friends.
Ingredients List
- 1 French baguette or Italian bread (about 12 inches)
- 1/2 cup unsalted butter, softened
- 4-6 cloves of garlic, minced (adjust to taste)
- 1/4 cup fresh parsley, finely chopped
- 1/2 teaspoon salt
- 1/4 teaspoon black pepper
- 1/4 teaspoon red pepper flakes (optional)
- 1/4 cup grated Parmesan cheese (optional)
Step-by-Step Instructions
-
Preheat the Oven: Start by preheating your oven to 400°F (200°C). This ensures that your garlic bread will achieve that crispy, golden perfection.
-
Prepare the Bread: While the oven is preheating, take the French baguette or Italian bread and slice it in half lengthwise. This will create two long pieces that will be topped with your flavorful garlic mix.
-
Make the Garlic Butter Mixture: In a medium-sized bowl, combine the softened butter, minced garlic, chopped parsley, salt, black pepper, and red pepper flakes (if using). Mix well until all ingredients are fully incorporated into a creamy consistency.
-
Spread the Garlic Butter: Spread a generous amount of the garlic butter mixture evenly over the cut sides of the bread. Ensure every inch is covered for maximum flavor.
-
Sprinkle with Parmesan: If you’re using Parmesan cheese, sprinkle it evenly over the buttered bread. This adds a delicious cheesiness to your garlic bread.
-
Bake the Garlic Bread: Place the bread halves on a baking sheet, cut side up, and slide them into the preheated oven. Bake for about 8–10 minutes, or until the edges are golden brown and the garlic is fragrant.
-
Slice and Serve: Once baked, remove the garlic bread from the oven and let it cool for a minute. Slice it into individual pieces and serve warm. Enjoy the incredible aroma and satisfaction of this garlic delight.
Pro Tips for Perfect Results
-
Temperature Matters: Use softened butter to make spreading easier, which will ensure an even layer of garlic goodness.
-
Adjust Garlic to Taste: The amount of garlic can be adjusted based on your preference. For a milder flavor, consider using fewer cloves.
-
Add Fresh Herbs: Besides parsley, try adding a pinch of oregano or thyme to enhance the flavor profile.
-
Broil for Extra Crispiness: If you like your garlic bread extra crispy, switch to the broiler for the last minute of baking. Watch closely to avoid burning.
-
Make It Cheesy: For extra cheesiness, consider adding mozzarella or cheddar cheese alongside the Parmesan.
Variations and Substitutions
- Whole Wheat or Gluten-Free: You can use whole wheat or gluten-free bread if you’re looking for a healthier option.
- Vegan Twist: Substitute the butter with plant-based alternatives and use nutritional yeast instead of Parmesan cheese for a vegan version.
- Add Toppings: Try adding toppings like sun-dried tomatoes or olives for a Mediterranean twist.
Storage and Reheating Tips
To store any leftover Garlic Bread Toast Slices, wrap them tightly in plastic wrap or aluminum foil and keep them in the refrigerator for up to 2 days. For longer storage, consider freezing the slices. To reheat, simply pop them in a preheated oven at 350°F (175°C) for about 5-7 minutes, or until heated through.
FAQ Section
1. Can I use dried garlic instead of fresh?
While fresh garlic provides the best flavor, dried garlic powder can be used in a pinch. Use about 1 teaspoon of garlic powder for every clove of garlic.
2. How do I make garlic bread in advance?
Prepare the garlic butter mixture and spread it on the bread as instructed, but do not bake. Wrap the bread and store it in the refrigerator for up to 24 hours. When ready to serve, bake it straight from the fridge, adding a couple of extra minutes to the cooking time.
3. Is garlic bread suitable for freezing?
Yes, garlic bread freezes well. Wrap it tightly in plastic wrap or aluminum foil and store it in an airtight container before placing it in the freezer. It can last up to 3 months.
4. Can I add other flavors to my garlic bread?
Absolutely! Consider adding ingredients like pesto for an herby kick, or cheese blends for more variety.
5. What’s the best bread to use for garlic bread?
While a French baguette or Italian bread is traditional, you can experiment with ciabatta, sourdough, or even sliced bread for different textures and flavors.
Nutrition Estimate
Each serving of Garlic Bread Toast Slices contains approximately 150 calories, 2 grams of protein, 15 grams of carbohydrates, and 9 grams of fat. Keep in mind that these values may vary based on your specific ingredient choices and quantities used.
Conclusion
Garlic Bread Toast Slices are simple to make yet incredibly satisfying, capturing the essence of comfort food in every bite. By following this comprehensive recipe, you can impress your family and friends with a dish that pairs beautifully with countless meals. The combination of garlic, butter, and herbs creates an irresistible flavor that will have everyone coming back for seconds. Enjoy the delightful process and the even more delightful result!